How To Make …. Luxury Wax Seal Invitations in A Few Easy Steps
As a designer, I love all my designs. But I have to say that this one takes the biscuit. I knew it was something special when I kept coming back to look at it. And then wanted to show it off. It's one of those magical designs that just fit together in the most perfect way.
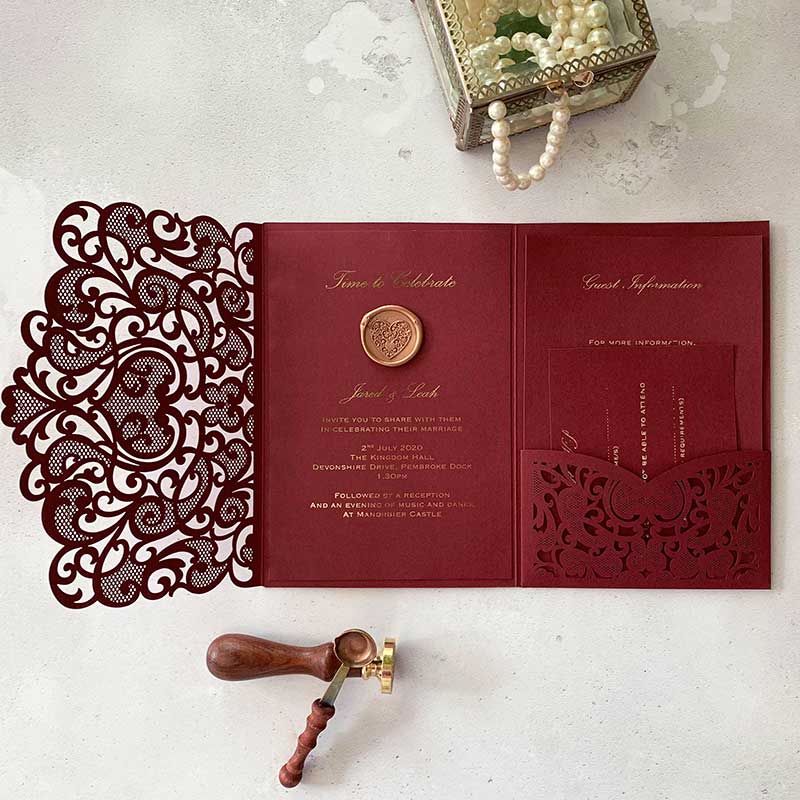
This design oozes elegance. The laser cut detail of the pocket, combined with the beautiful wax seal add a special touch of magic. Although it looks like a bank breaking design, it's actually really economical to make.
I've made this design in a Wine (Burgundy) and Rose Gold. But it could be easily replicated in a range of other colours. I just love the drama of this beautiful combination.
For Each Invitation You Will Need:
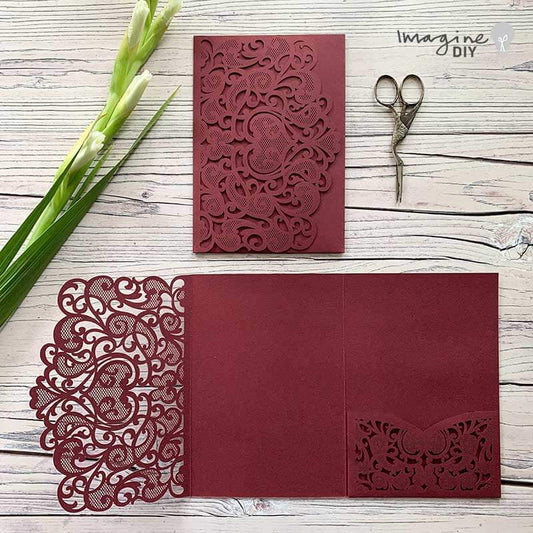
1 x Amelie Laser Cut in Wine. (click here)
3 x Amelie Burgundy Inserts
1 x Scroll Heart Wax Seal (click here)
1 x Copper Wax Stick. (click here)
Double Sided Tape. (click here)
Also:
Envelope. (click here)
Wax Melting Spoon. (click here). OR
Wax Seal Gun. (click here)
Laminator
Scissors
Toner Reactive Foil
Laser Printer
Paper Trimmer
If you’re not big on reading instructions, we’ve put together a video to show you how it’s done. (just press play)……
INVITATION PANEL
GUEST INFORMATION
RSVP
I used the Font Palace Script and Mrs Eaves Petit Caps.
So Here Are The Instructions……

PRINTING
- Download the following templates:
INVITATION PANEL
GUEST INFORMATION
RSVP
I have used the fonts Palace Script and Mrs Eaves Petit Caps. If you don't have these fonts on your computer, you might find that the templates look a little weird when you first open them. However, by changing the fonts and font sizes, they will look much more like the sample in the picture. HOWEVER, please be sure to keep the texts within the boxes provided. - Type your wording in the spaces provided. Make sure you check that the spelling, grammar and layout are all correct. You will also need to check that the times, dates and locations are all included.
- Print your wording onto the inserts.
- You will need to trim your Guest Information sheet and RSVP to the following sizes:
Guest Information - Remove 0.25cm from the left and right side so that it measures 11.5cm wide x 17.5cm high
RSVP - Trim to 9cm high. (save the extra piece of card left over for your wax seal)
FOILING
If you are using a pale insert (e.g. white, ivory or blush pink), foiling is not necessary. But the metallic finish that you get from foiling adds an incredible sense of luxury and is definitely worth the extra time and small extra expense involved.
You will need a basic laminating machine (you can normally pick them up for about £10 or so). You will need to use a LASER PRINTER to print your text (in black ink).
You will need to purchase Toner Reactive Foil in your choice of colours (I have used Minc's Foil in Rose Gold .
- Warm up you laminating machine.
- Cut off a piece of toner reactive foil large enough to cover the text area. Although I've rushed this in the video, it's best to take a little time to make sure there is no wastage.
- Lay the foil on top of the text and feed it into the laminating machine.
- Once the magic has happened and the laminating machine has finished it's work, peel off the toner reactive foil to reveal a beautifully metallic text.
(TIP - If you find there is a little excess foil on your panel, just use a clean cloth and lightly rub it off. It shouldn't stick firmly onto anything other than toner)
Watch this video to see how it's done:
WAX SEAL
It's easy to make a mistake when you're working with hot wax. So to make sure you get a great result every time, I would recommend making the wax seal on a separate piece of card. But if you're feeling very brave, just go for it and make the wax seal directly on the invitation panel. The instructions I am going to give you are for making the seal on a separate piece of card.
- Place a piece of matching card (the off cut from the RSVP) onto a flat surface.
- Cut off a small section of the wax stick (or use wax beads) and place into the wax melting spoon.
- Hold the spoon over a lighted tea light and hold until all the wax is melted. You will be able to tell that the wax is ready when the hard section in the middle has dissolved.
- Pour the wax out onto the card. Because it is a small piece of card, the heat might make it warp a little, so hold it flat with your fingers so that the wax stays roughly circular.
- Wait about 15 seconds for the wax to cool a little and then press the stamp into the centre of the wax.
- Be patient - wait a little while for the wax to cool. After about a minute, you should be able to remove the stamp from the wax. If you find it is not coming away easily, wait a few more seconds.
- Once your wax seal is made, use a scissors to cut around it so that you are left with just the seal with a card backing the same colour as your invitation.
MAKING THE INVITATION
So this is the easy part. You just need to put it all together.
- Place your invitation panel face down on a flat surface. Stick double sided tape around the outside edges and across the middle. Peel off the backing and stick the panel into place in the centre of the laser cut invitation. Make sure your borders are nice and even.
- Stick a strip of double sided tape to the back of your wax seal. Peel off the backing strip. Place a second strip of double sided tape across the back of your wax seal to form an X shape. Peel off the backing strip.
- Stick the wax seal into place on your invitation panel.
- Place your Guest information and RSVP card into the invitation pocket
and your done!!!
I loved this invitation so much, I made it in an alternative colour way just for you to see. This one has been made using an Ivory Amelie Invitation and Inserts with Rose Gold Text and Champagne Sealing Wax.