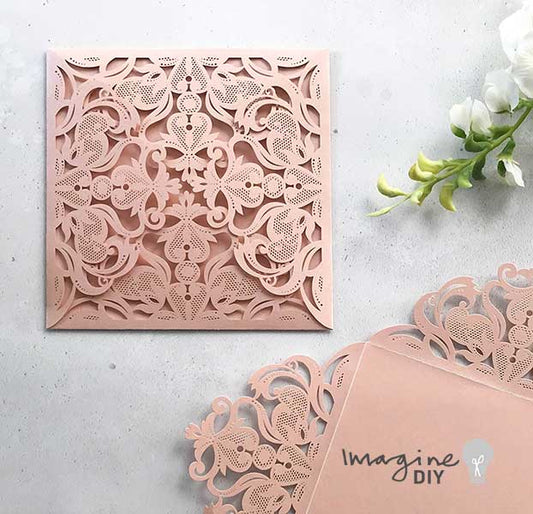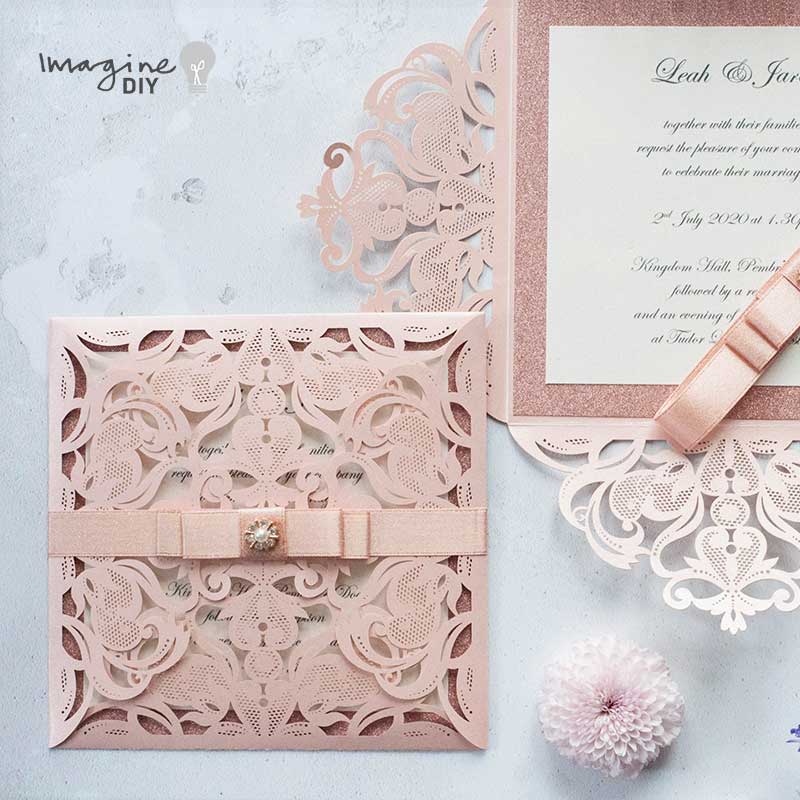
Blush Pink Jaipur with Bow
For Each Invitation You Will Need:
1 x Jaipur Laser Cut Invitation in Blush Pink (click here)
1/2 x Rose Gold A4 Glitter Card (1 sheet makes 2 invitations) (click here)
1/2 x Pearlised Ivory A4 card (1 sheet makes 2 invitations) (click here)
1 x Rose Gold Dior Bow (click here)
1 x Leia Rose Gold Embellishment (click here)
You Might Also Need:
1 x Paper Trimmer
1 x Blush Pink Envelope (optional) (click here)
1 x Hot Melt Glue Gun (optional) (click here)
1 x Hot Melt Glue Stick for each 25 invitations (optional) (click here)
1 x Tape Runner for each 20 invitations (optional) (click here)
Blush Pink continues to be a really popular colour within the wedding industry. So we wanted to celebrate that by making an invitation that was all about the blush! I think this one says it all! It's absolutely stunning!
And even better, this invitation is really easy to make.
If you don't have a printer, you don't need to worry......we can print the inserts for you (see below for details).
Don't like the colour but love the invitation? No problem.......get in touch and we'll do our very best to accommodate your colour choice.
If you're not big on reading instructions, we've put together a quick video to show you how it's done (just press play)……
INVITATION TEMPLATE
We used the following font:
Edwardian Script
Here Are The Instructions……

Instructions
- Add all the item you need in to your basket and wait excitedly for them to arrive (don't worry....they normally arrive really quickly!!). If you would like us to print the inserts for you, make sure you purchase the inserts PLUS the printing option for the amount of invitations you require.
- Use your paper trimmer to cut the Rose Gold Glitter Card to the following measurement:
14.5cm x 14.5cm - Use your paper trimmer to cut the Pearlised Ivory Card to the following measurements:
12.75cm x 12.75cm - Download the Invitation Template. Type your wording in the printable areas. (We used the following font........Edwardian Scripts). If you're printing your own inserts, you should now be ready to print and move on to the next step.
- Place your Rose Gold Glitter Card Panel face down on a flat surface. Use your tape runner to run a line of glue around each outside edge of the panel and across the middle. Press the panel in to place inside the laser cut invitation.
- Use your tape runner (or double sided tape) to stick the printed invitation panel on top of the glitter card.
- Close the laser cut invitation so that all the flaps meet in the middle. Place the centre of the Dior Bow at the front centre of the invitation and fold both loose ends around to the back. Use your glue gun to run a small line of glue across one end of the ribbon. Press the opposite end of the ribbon in to place on top of the glue to form a band of ribbon around the card. When you do this, make sure that you don't pull it too tight because you want to be able to pull it off easily to read the invitation inside.
- Take your embellishment and place a small amount of glue from the glue gun on to the flat back. Quickly press it in to place in the centre of your Dior bow. You can now reposition your Dior bow so that it sits neatly on your invitation.
.....and that's it!! Sit back ..... your work here is done!!!! Yay!