Make Your Own Rustic Invitations with Lace Holder
I have to admit to not being able to take full credit for this awesome design! It was actually inspired by a great friend of my daughter (Millie). As soon as she came up with the idea, I knew I wanted to run with it. Using lace and card to make an invitation holder means that you can add as many information sheets as you need. The holder will keep everything neatly together and look pretty awesome too!
The great thing about this invitation is that even though we've designed it in blush pink, ivory and kraft, you can easily change the colour just by choosing an alternative colour backing or accent. You can also add ribbon instead of lace, or change the resin flower to one of our beautiful crystal or pearl embellishments. The basic principle will stay the same.
For Each Invitation You Will Need:
2 x Kraft Card (click here)
1 sheet of Matt Off White Card (click here)
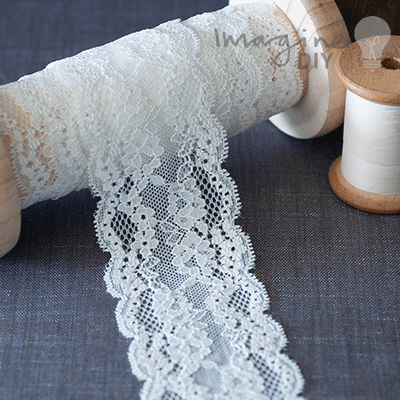
18cm of Eleonora Lace (click here)
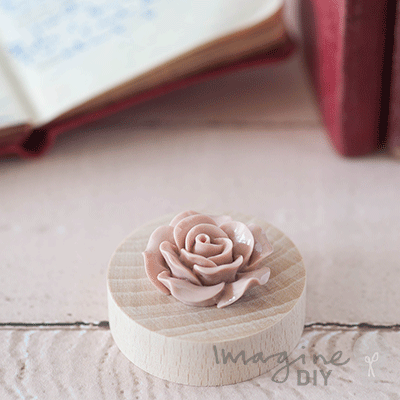
1 Large Resin Rose in Blush Pink (cick here)
2 meters of Fine Flaxcord in Natural (click here)
Also:
Paper Trimmer (you only need one of these!)
Tape Runner (click here)
Glue Gun (click here)
Scissors
Blush Pink RSVP Envelopes
Blush Pink Envelope 19.5cm x 13.5cm (click here)
TIP – Change the backing card, lace or embellishment to coordinate with your theme.
If you’re not big on reading instructions, we’ve put together a video to show you how it’s done. (just press play)……
You’ll also need to download this template…..
INVITATION, RSVP and FRONT TAG TEMPLATE
We used the following font:
Aidan Script and Century Gothic
So Here Are The Instructions……

Instructions
- Download the following templates:
INVITATION, RSVP and FRONT TAG TEMPLATE
Type your wording in the spaces provided. Make sure you check that the spelling, grammar and layout are all correct. You will also need to check that the times, dates and locations are all included.
We used the following fonts....Aidan Script and Century Gothic - Print the Invitation, RSVP and Front tag document onto one sheet of Matt Off White A4 card. You will then need to use your paper trimmer to cut each item down to size. You will need to cut just inside the outlines provided on the template so that the finished document sizes are as follows:
Invitation Panel - 18cm x 12cm
RSVP Panel - 12cm x 8cm
Front Tag - appx. 2.7cm x 7.5cm (I like to cut these by hand using a scissors) - Use your paper trimmer to cut the Kraft Card to the following sizes:
3 x 19cm x 13cm panels
1 x 13cm x 9cm
Save the offcuts for the front tag. - Use your tape runner to stick the invitation panel onto one of the large Kraft Card Panels. Make sure that your borders are even.
- Use your tape runner to stick the rsvp panel onto the small Kraft Card Panel. Make sure that your borders are even.
- If you haven't already cut the front tag panel, use a scissors to cut along the guide lines provided. Once you have cut the tag into a rectangle shape, cut the top end into a V shape.
- Use the tape runner to stick the tag onto an offcuts of Kraft Card. Carefully use the scissors to cut around the tag, so that about 3mm of kraft card shows all the way around.
- Cut a section of Eleonora Lace appx. 18cm long. Place your completed invitation on top of one of the large kraft card panels. Place the Eleonora Lace across the middle of the invitation and fold around to the back of the large kraft panel. Use a tape runner to stick the loose ends of the lace into position, making sure that they are level.
This will form the start of your invitation holder. - Take the final large kraft card panel and use the tape runner run a line of tape around the outside edges and across the middle.
- Use your glue gun to place a line of glue along the lace at the back of the invitation holder. Before the glue has dried, quickly apply the pre-taped panel on top so that you have a double layer of card with the lace secured in between.
- Cut a section of flax cord appx. 2 meters long. Find the middle of the cord and begin wrapping it around and around the invitation until you have enough left at the front to make a nice bow.
- Tie a double knot at the centre front of the invitation. One your knot is secure and in place, tie a neat bow. Trim off any loose ends.
- Use your glue gun to place a small blob of glue on the point of the tag. Press into place just underneath the bow, making sure that none of the glue leaks through to the invitation behind.
- Apply glue from your glue gun to the back of the resin rose. Press into place on top of the bow and tag, making sure that none of the glue leaks through to the invitation behind.
And your done .... whoop whoop!