Make Your Own Envelope Liners from any Paper
Envelope liners are a fabulous way of adding a luxurious finishing touch to your invitation.
We've put together a brief tutorial to help you make your own.
Using this tutorial, you will be able to make envelope liners for any size envelope with practically any paper. So why not give it a go?
For this Envelope Liner, we’ve used the following items:
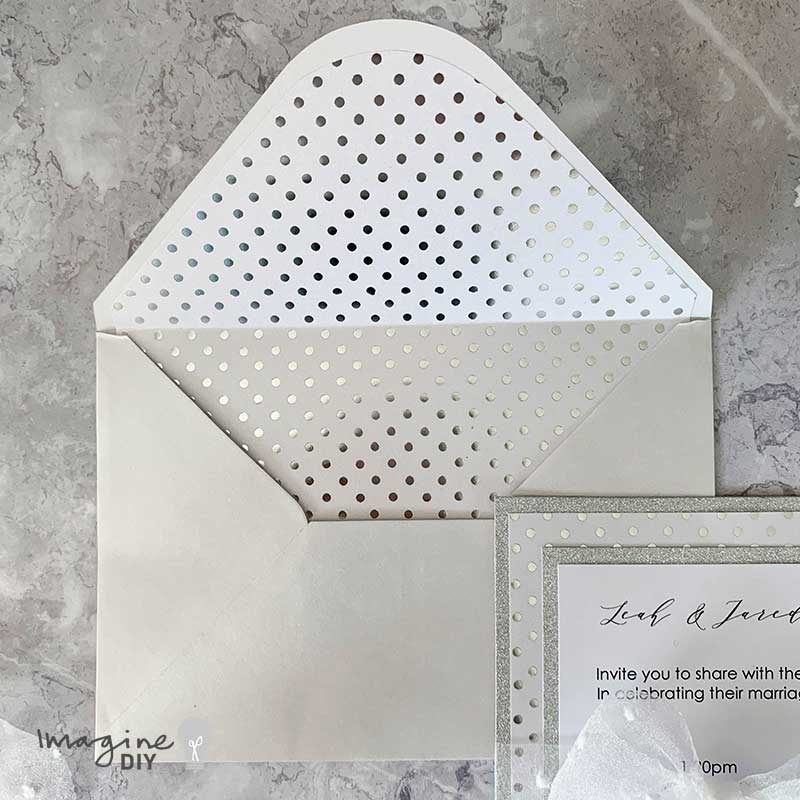
1 sheet of Polka Lustre Paper (click here)
1 - 19.4cm x 13.5cm pearlised white envelope (click here)
1 tape runner (click here)
1 scissors
1 pencil
1 Ruler
1 piece of card
If you’re not big on reading instructions, we’ve put together a quick video to show you how it’s done (just press play)……
So Here Are The Instructions……


TOP TIP.......
You might damage one envelope by making a template. (e.g. you may get a small pencil mark on the envelope) But it's well worth the effort. It will save you from damaging any more envelopes.
FIRST ...... MAKE A TEMPLATE
- Place a piece of card on a flat surface (the card will need to be at least as big as your envelope when opened)
- Open up your envelope and place it on top of the card. Use your pencil to draw around the outside edge of the envelope.
- Remove the envelope and use the scissors to cut around the pencil line. This will be your template.
- Your template will now be exactly the same size as your envelope so you need to trim it down so that it will neatly slot inside. Using your ruler, draw a line appx. 0.5cm in from the left side of the template and another one appx. 0.5cm from the right side of the template. You only need to do this along the straight edge.
- Draw another line appx. 1cm from the bottom of the template. You should now have 3 lines .....1 running down each side and 1 across the bottom. Use your scissors to cut along these lines. You will now have a template that should fit neatly inside your envelope.
NOW ...... USE YOUR TEMPLATE
- Place your patterned paper on a flat surface.
- Place your template on top of the paper. (If possible, to save on cutting, line one side and the bottom up with the bottom and side of the paper).
- Use a pencil to draw around the template.
- Use a scissors to cut around the pencil line.
- Open up your envelope and slot the envelope liner in to place, making sure that the pattern is facing you.
- Once you are happy with the position of the paper, carefully fold down the flap of the envelope and the paper together until the envelope is closed. Run a finger across the crease line to make sure that the liner has a good crease.
- Open the envelope back up. With the flap held open, fold the top of the envelope liner down towards the bottom of the envelope. You can now run tape around the edges of the envelope liner. Once this is done, you can press the envelope liner in to place against the envelope flap.
And you're done. Once you've mastered this, you will be able to make envelope liners for any size envelope, out of practically any paper.