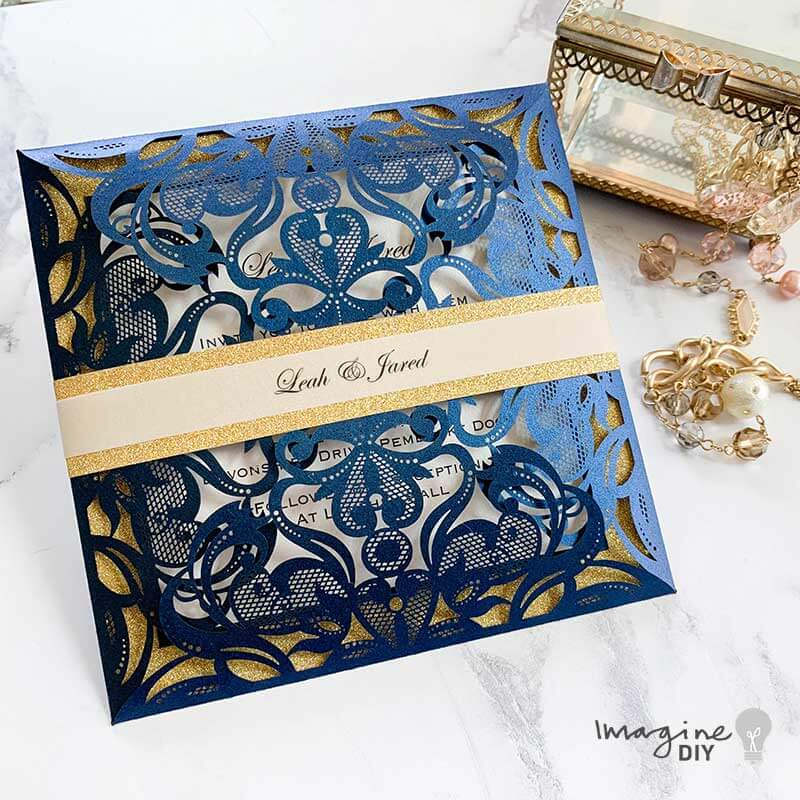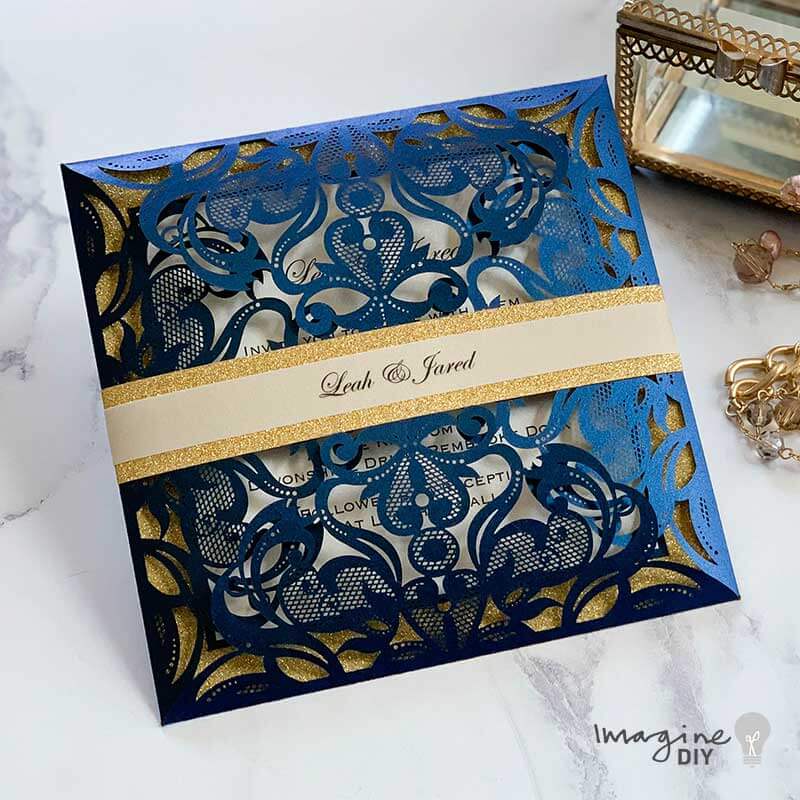
Make Your Own Luxury DIY Wedding Invitations
This beautiful DIY wedding invitation is chic and stylish and really easy to make. The gold glitter adds a perfect accent to the navy background, giving a sense of real luxury.
Why not give it a go and really impress your guests?
For Each Invitation You Will Need:
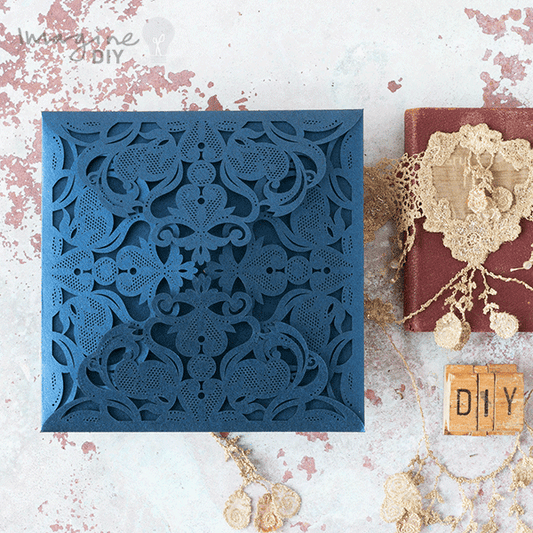
1 x Jaipur Laser Cut Invitation in Navy (click here)
1/2 sheet of Gold Glitter Card (1 sheet makes 2 invitations) (click here)
1/2 sheet of Pearlised Navy Card (1 sheet makes 2 invitations) (click here)
1/8 sheet of Gold Glitter Paper (1 sheet makes 8 invitations) (click here)
1/5 sheet of Vellum Paper (1 sheet makes 5 invitations) (click here)
1/2 of Pearlised Ivory Card (1 sheet makes 2 invitations) (click here)
Also:
PaperTrimmer (you only need one of these!)
Tape Runner (click here)
TIP – Change the backing card or choose a different laser cut to coordinate with your theme.
If you’re not big on reading instructions, we’ve put together a video to show you how it’s done (just press play)……
INVITATION TEMPLATE
FRONT BAND TEMPLATE
We used the following font:
Edwardian Script and Century Gothic Light
So Here Are The Instructions……

Instructions
- Use your paper trimmer to cut your Pearlised Ivory card to the following measurements: 11.5cm x 11.5cm (you should be able to cut 2 panels out of each sheet)
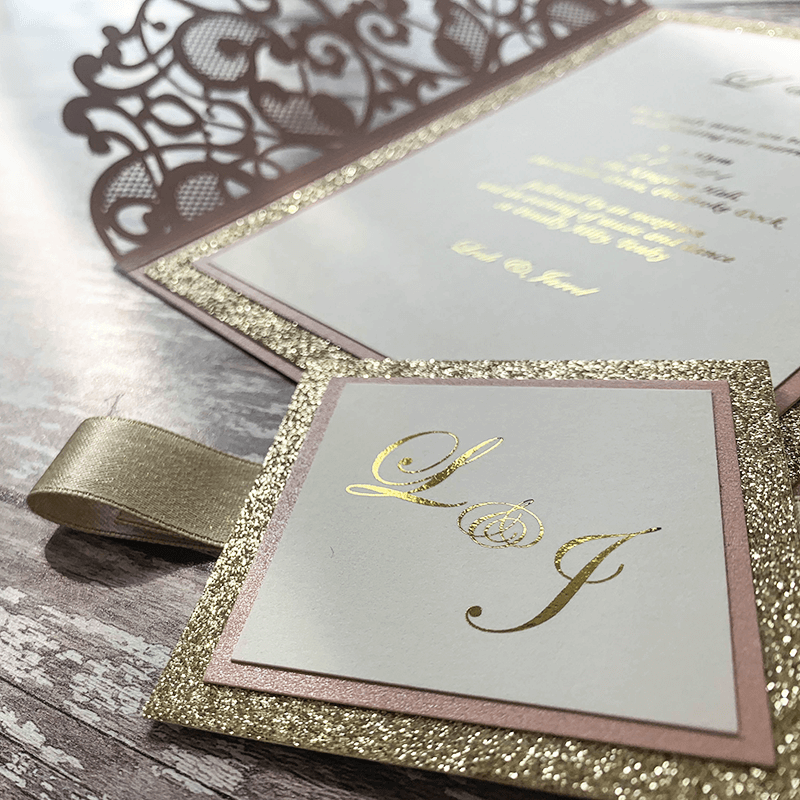
- Download the INVITATION TEMPLATE. Type your wording in the printable areas. (We used the following fonts……..Edwardian Script and Century Gothic Light). Print the wording on to the pearlised ivory card panel.
- Use your paper trimmer to cut your Gold Glitter card to 14.5cm x 14.5cm. (you should be able to cut 2 panels out of each sheet)
- Use your paper trimmer to cut your Pearlised Navy card to 12cm x 12cm. (you should be able to cut 2 panels out of each sheet)
- Open up your laser cut invitation.
- Place your gold glitter panel face down and use your tape runner to stick tape around the outside edge and across the middle of the card. Turn it over so that the glitter side is facing you and press in to place in the centre of the laser cut invitation, making sure that the borders are even.
- Use the tape runner to stick the pearlised navy panel on top of the gold glitter card, making sure your borders are even.
- Use the tape runner to stick the printed invitation panel on top of the pearlised navy card, making sure your borders are even.
- Cut a strip of Gold glitter paper 17.5cm long x 2.5cm wide. You might have trouble cutting 2.5cm width. If you do, you will need to cut in reverse. (e.g. if you have a section of paper 17.5cm x 17.5cm, your first cut would be at 15cm, your next cut would be at 12.5cm etc. The section you cut off will be 2.5cm wide)
Cut another strip of gold glitter paper 15cm long x 2.5cm high. - Download the FRONT BAND TEMPLATE. Type your wording in the printable areas. (We used the following font……..Edwardian Script). Print the wording on to the vellum paper.
- Use your paper trimmer to cut the along the guides provided on the template. You should have long strips of vellum with your names printed across. They should measure appx. 2.5cm wide.
Once you have done this, trim them down so that they are appx. 17.5cm wide; making sure that the text sits in the centre. - Using the offcuts of vellum, cut sections of vellum 15cm wide x 2.5cm high.
- Close your invitation and place the longer band of glitter paper across the front centre. Fold each loose end around to the back while you hold it in place.
- Turn the invitation over and place the shorter strip of gold glitter paper across the back centre. Use your tape runner to run a small piece of tape along the back one of the overlapping ends of the longer strip of paper. Fold and press this in to place on top of the shorter strip of paper.
Repeat this process with the opposite side. Once you have done this, you should what looks like a continuous gold glitter band around your invitation. - With your invitation facing up, place your printed vellum strip so that the text sits in the centre of the gold band. Fold each loose end around to the back while you hold it in place. Turn your invitation around so that the back is facing you. Use a small strip of glue from your tape runner to secure each loose ends on to the gold glitter band.
- Take your smaller strip of vellum paper and use your tape runner to stick in to place with a small amount of glue on each end.
You now have a beautiful invitation ready to send out to one of your special guests. It’s time to get excited!