Make Pretty Autumn Wedding Stationery
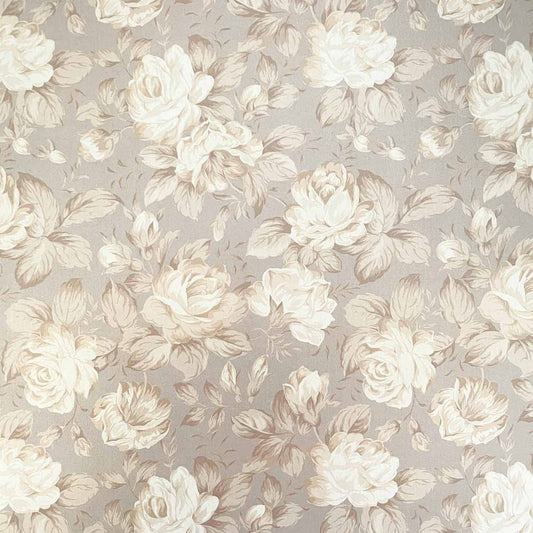
In the heart of wedding season, it's difficult to find time to design something beautiful. So we took a look through our archives to see if there was anything we could inspire you with. I have to say that when I found the images of this Autumn Wedding Stationery, I was blown away. I can't believe we've never used them before. We made this gorgeous wedding stationery range when our Woburn Paper first arrived in stock. We loved it so much, we used it as a feature range for a photography shoot and WOW did it turn out well!! This is a stunning range for Autumn months or rustic weddings. However, with a change of paper, you can completely change the mood of this range.
TIP:
This range is cheap to make BUT it does require the purchase of a Die Cutting Machine, a magnetic cutting pad and a set of nesting dies.
We used:
Sizzix Big Shot (cheaper alternatives are available)
Little B Labels Cutting Dies (this is a set of nesting dies)
A good die cutting machine and some dies are great things to add to your craft tool kit. With a one off expense at the start, you can massively reduce the overall cost of your wedding stationery!
So Here Are The Instructions……
INVITATION
You Will Need:1/2 sheet of Woburn Paper
1 Sheet of Pearlised Ivory A4 Card
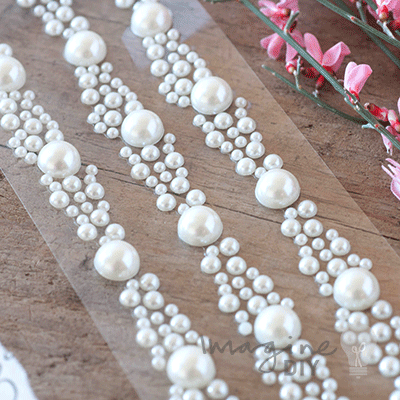
1 x 4mm self adhesive pearl
You Will Also Need:
Die cutting machine and dies as listed above
Paper Trimmer
Tape Runner or Double Sided Tape Mini mounting pads or foam pads
Instructions:
- Cut a piece of Pearlised White Card 14.5cm x 14.5cm
- Cut a piece of Woburn Paper 14.5cm x 14.5cm and stick on top of your pearlised white card using a tape runner or double sided tape.
- Print your wording on to a sheet of card. This is the trickiest part of the design.
First you need to choose which size die you would like to use.
Next you need to measure the large area in the centre of the die (taking out the flourishes at the side and top). You need to make sure that your wording will fit comfortably into the central area of the die.
Once you have printed your wording, cut it so that it will fit through the die cutting machine. This does not have to be precise.
Place your wording face up on the magnetic cutting mat.
Place your cutting die face down on top of the wording. At this stage, you need to make sure that you line the die up so that the wording sits exactly in the centre.
If you want to add a perforated edge, place the perforated die inside the edges of the cutting die. You can now run your wording and die through the die cutting machine to make your beautiful invitation panel. - Stick your wording panel on top of the Floral Panel using mini mounting pads. Make sure that the borders are even.
- Peel off a 4mm self adhesive pearl and stick this to top centre of the panel.
RSVP Card
You Will Need:1/4 sheet of Woburn Paper
1/4 Sheet of Pearlised Ivory A4 Card
1/4 sheet of Pearlised Ivory A4 Paper
1 x 3mm self adhesive pearl
You Will Also Need:
Die cutting machine and dies as listed above
Paper Trimmer
Tape Runner or Double Sided Tape
Mini mounting pads or foam pads
Instructions:
- Select the same size die as you used for the invitation panel. Cut a sheet of woburn paper slightly larger than the die.
Place the paper face up on the magnetic cutting pad.
Place your cutting die face down on top of the woburn paper and feed through the die cutting machine. - Use the same die to cut a piece of pearlised ivory card the same size.
- Stick the Woburn paper on to the pearlised ivory card using double sided tape or a tape runner.
- Print your wording on to a sheet of card. This is the trickiest part of the design.
First you need to choose which size die you would like to use. It will need to be at least one size smaller than the die you used for the back panel.
Next you need to measure the large area in the centre of the die (taking out the flourishes at the side and top). You need to make sure that your wording will fit comfortably into the central area of the die.
Once you have printed your wording, cut it so that it will fit through the die cutting machine. This does not have to be precise.
Place your wording face up on the magnetic cutting mat.
Place your cutting die face down on top of the wording. At this stage, you need to make sure that you line the die up so that the wording sits exactly in the centre.
If you want to add a perforated edge, place the perforated die inside the edges of the cutting die. You can now run your wording and die through the die cutting machine to make your beautiful RSVP panel. - Stick your RSVP panel on top of the Floral Panel using mini mounting pads. Make sure that the borders are even.
- Peel off a 3mm self adhesive pearl and stick this to top centre of the panel.

LINED ENVELOPE
You Will Need:
1 x square envelope
1/2 sheet of Woburn Paper
You Will Also Need:
Tape Runner or Double Sided Tape
A Sharp Scissors
A Ruler
A Pencil
Instructions:
- First of all place the Woburn paper face down on a flat surface.
- Open up your envelope and place it on top of the paper so that the point of the envelope is near the top of the paper. Take a pencil and draw around the outline of the envelope.
- Take your scissors and following the line you have just drawn, cut the paper about 1/2 cm smaller at the sides. By the time you have finished, you should end up with a liner shape that is the same shape as your envelope but slightly smaller.
- Slide your liner inside the envelope with the chosen paper facing out.
- Run a line of double sided tape around the outside edge of your envelope flap (about 1cm in from the edge). Press your envelope liner on to the tape, making sure that it follows the edge, about 0.5cm in from each side.
- Lastly you can now fold your envelope closed and press along the crease.
Watch this video to see how it's done ...
FAVOUR BOX
You Will Need:
1 x favour box
1 sheet of Woburn Paper
1/8 sheet of Pearlied Ivory Card
1 row of 3mm self adhesive pearls
You Will Also Need:
Die cutting machine and dies as listed above
Tape Runner or Double Sided Tape
Mini mounting pads or foam pads
- Assemble the base of your favour box.
- Use double sided tape to stick the woburn paper on to the lid of the favour box. You will need to run the tape around the edges of the lid so that it covers it completely. Use a scissors to trim off any overlapping paper, carefully following the outline of the box lid. Fold and assemble the box lid so that the woburn paper is showing.
- Print your logo or wording on to a sheet of card. This is the trickiest part of the design.
First you need to choose which size die you would like to use. I used the smallest die in the pack.
Next you need to measure the large area in the centre of the die (taking out the flourishes at the side and top). You need to make sure that your logo or wording will fit comfortably into the central area of the die.
Once you have printed your wording, cut it so that it will fit through the die cutting machine. This does not have to be precise.
Place your wording face up on the magnetic cutting mat.
Place your cutting die face down on top of the wording. At this stage, you need to make sure that you line the die up so that the wording sits exactly in the centre.
If you want to add a perforated edge, place the perforated die inside the edges of the cutting die. You can now run your wording and die through the die cutting machine to make your beautiful panel.
- Stick your panel on top of the favour box lid using mini mounting pads. Make sure that the borders are even.
- Peel off a row of 3mm self adhesive pearls. Starting at one side of the die cut panel, press them in to place around the side of the box, cutting off any excess when you reach the bottom of the lid. Repeat this process on the opposite side of the die cut panel. When you have finished, it should look as through the pearls run across the top of the lid.
- You can now fill your favour box and put the lid on to the base.

GUEST BOOK
You Will Need:
1 x blank guest book
1/2 sheet of pearlised ivory card 1 sheet of Woburn Paper
6 rows of 4mm self adhesive pearls
You Will Also Need:
Die cutting machine and dies as listed above
Paper Trimmer
Tape Runner or Double Sided Tape
Mini mounting pads or foam pads
Instructions:
- Measure the front of your guest book from the fold to the outside edge. Cut a piece of Woburn paper 1cm narrower and shorter.
- Use double sided tape to stick the Woburn paper on to the front of your guest book, making sure that you keep the borders even.
- Peel off a row of self adhesive pearls. Starting in one corner, press the pearls in to place along the outside edge of the Woburn paper. When you reach a corner, cut off any excess and restart the line so that it follows the line of the paper all the way around. Keep going until you have a continuous line of pearls around the outside edge of the patterned paper.
- Print your front panel wording on to a sheet of card. This is the trickiest part of the design.
First you need to choose which size die you would like to use.
Next you need to measure the large area in the centre of the die (taking out the flourishes at the side and top). You need to make sure that your wording will fit comfortably into the central area of the die.
Once you have printed your wording, cut it so that it will fit through the die cutting machine. This does not have to be precise.
Place your wording face up on the magnetic cutting mat.
Place your cutting die face down on top of the wording. At this stage, you need to make sure that you line the die up so that the wording sits exactly in the centre.
If you want to add a perforated edge, place the perforated die inside the edges of the cutting die. You can now run your wording and die through the die cutting machine to make your beautiful panel. - Stick your panel on top of the Woburn Paper using mini mounting pads. Make sure that the borders are even.