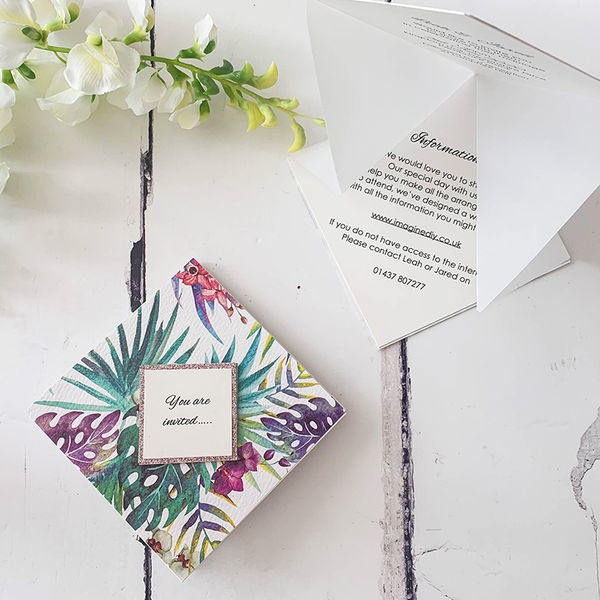
Make Your Own Pop-Up Origami Style Invitations
As designer at Imagine DIY, I sometimes have to reel in my crazy side. I do love things that stand out from the crowd. The idea for this quirky invitation popped into my head some time ago. But I wasn't sure if I could make it work. O h my goodness!!! I can't even describe how excited I was when I finished work on this design. It literally made me want to get married all over again.
There are a few awesome things about this invitation:
- It's pretty cheap to make
- It's really different
- It can be easily customised
- You don't need to be an amazing crafter to make it.
Why not give it a go?
For Each Invitation You Will Need:
1 x A4 Vellum Paper. (click here)
1/3 sheet of Patterned paper of your choice (1 sheet makes 3 invitations). (click here)
1 sheet of Matt White A4 Card. (click here)
1/12 sheet of Glitter Cardof your choice (1 sheet makes 12 invitations). (click here)
Also:
Envelope
Paper Trimmer / Scorer
If you’re not big on reading instructions, we’ve put together a video to show you how it’s done. (just press play)……
You’ll also need to download this template…..
We used the following font:
Alex Brush and Century Gothic
So Here Are The Instructions……
- Download the following template:
INVITATION TEMPLATE
Type your wording in the spaces provided. Make sure you check that the spelling, grammar and layout are all correct. You will also need to check that the times, dates and locations are all included.
We used the following fonts....Alex Brush and Century Gothic. - Print the wording onto an A4 sheet of Card (we've used Matt Off White).
- Use a paper trimmer to cut your vellum paper to:
21cm x 21cm square. - Fold the vellum square in half, matching up the edges. Press firmly along the fold line.
- Open the folded vellum and turn 90 degrees. Fold in half again and press along the fold lines. When you open the vellum out, it should look as though you have 4 separate quarters.
- With the vellum opened out, turn it over so that the raised creases are facing you. Fold along the diagonal line to create a triangle shape, making sure to match the edges. Press firmly along the fold line to create a sharp crease.
- Open out your invitation, place on a flat surface and press your finger in the middle. It should pop roughly into place. With the 2 square panels at the top and bottom, pull the sides in towards the centre. When the 2 triangles meet in the centre, hold in place and press along the creases. At this point, when you look at the invitation, it should look square.
- Now you need to cut your wording to size. Use your paper trimmer to cut the invitation panel and guest information down to 10.5cm x 10.5cm square. If you cut just inside the guide marks, you should have the right size. Cut the front panel down to appx, 4cm x 4cm square.
- Open up the pre-made vellum invitation. At the flat square panel facing you, run double sided tape around the outside edges and along the centre. Carefully press your guest information into place so that it sits exactly on the square panel and rests against the crease lines. Make sure that you do not overlap the creases or your invitation will not fold properly. Repeat this for the invitation section at the top of the vellum invite. You should now have the inside of the invitation completed.
Fold your invitation back into shape and press along the creases. At this point, you may need to give it a little tease. - Use your paper trimmer to cut 2 pieces of patterned paper 10.5cm x 10.5cm.
With the invitation closed, stick a panel of printed paper to the front using double sided tape.
Our the invitation over and stick the other panel of printed paper to the back. - Cut a section of Glitter Card 4.5cm x 4.5cm. Use double sided tape to stick the printed front tag on top.
- Peel off some mini mounting pads and stick them to the back of the panel. Peel off the backing layers of the mini mounting pads and stick into place at the front of the invitation.
And you've finished!!
If you use this tutorial, I'd love to hear from you and see the finished results.
Hugs from Leah