
Make Gorgeous Lily Laser Cut Wedding Stationery
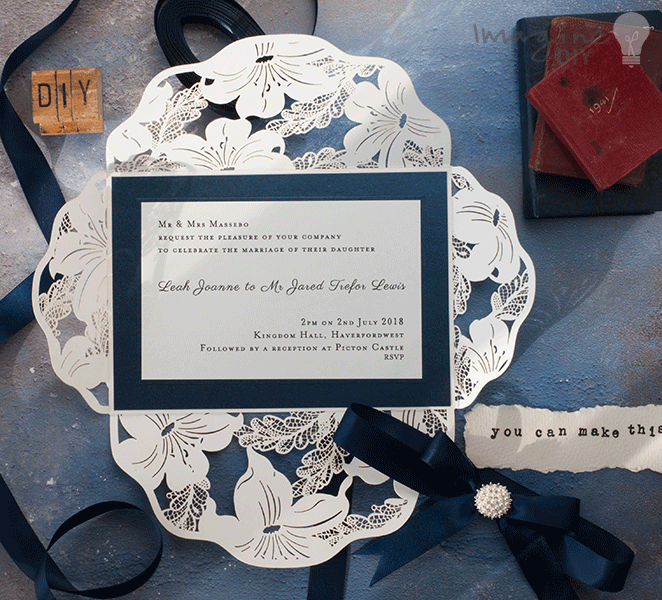
Although we love all our Laser Cut Invitations, the Lily Laser Cut Wedding Stationery has to be one of my personal favourites. So imagine how excited I was when we received a delivery of laser cut panels to match the invitations. The beautiful panels are a great (not to mention low cost) way of creating coordinating wedding stationery.
The best thing about our blank laser cut ranges is that even if you are not that creative, you can still make really striking wedding stationery that will blow your guests minds. This range is a perfect example of what you can achieve.
I love the contrast of the Navy against the matt off white. But if Navy doesn’t work for you, just change the colour of the card and ribbon...simple!
So Here Are The Instructions……

INVITATION
You Will Need:
1 x Lily Laser Cut Invitation (click here)
1 x Matt off white insert (click here)
1 sheet of pearlised navy A4 card (click here)
1/3 sheet of matt off white A4 card (click here)
1 x Alexis (click here)
appx. 70cm of 16mm Navy Satin Ribbon (click here)
You Will Also Need:
Paper Trimmer
Tape Runner or double sided tape (click here)
Glue Gun (click here)
Scissors
Instructions:
- Firstly print your wording on to Matt Off White Card and Cut to size. The finished size should be 15cm wide x 9.5cm high. You should be able to fit 3 panels on each sheet of card if you lay it out carefully.
- Secondly put a piece of Pearlised Navy Card 18cm x 12.5cm. Stick this on to the inside panel of your laser cut card using double sided tape (or your tape runner)
- Cut a second piece of Pearlised Navy Card 15.5cm x 10cm. Stick this on top of the larger navy panel (make sure that all the borders are even)
- Stick your wording panel on top of the Navy Card.
- Cut a length of navy ribbon appx. 40cm long. Lay it on a flat surface and place your invitation on top of it. The ribbon will need to match the centre of your card.
- Fold the edges of the ribbon in to the centre front of the laser cut invitation. Hold down the left side and use your glue gun to secure the right side on top. Make sure that you do not spill any glue on to the laser cut invitation!! The join should be at the front centre of your card (it will soon be covered with a bow). Make sure that you don’t pull it too tight as you secure it. You need to make sure it’s tight enough to stay on the card but loose enough to slide off.
- Use the remaining ribbon to tie a neat bow (I like to use the bunny ear method). Carefully glue your bow on to the front centre of the ribbon, making sure not to spill any glue on to the laser cut card.
- Lastly use the glue gun to stick the Alexis embellishment on to the centre of the bow.

RSVP
You Will Need:
1 x Lily Laser Cut flower (click here)
1/8 x Matt off white card (click here)
1/4 sheet of pearlised navy A4 card (click here)
1 x Alexis (click here)
appx. 70cm of 16mm Navy Satin Ribbon (click here)
You Will Also Need:
Paper Trimmer
Tape Runner or double sided tape (click here)
Mini mounting pads or foam pads
Instructions:
- First of all print your wording on to Matt Off White Card and Cut to size. The finished size should be 9cm wide x 6.5cm high. You should be able to fit 8 panels on each sheet of card if you lay it out carefully.
- Secondly cut a piece of Pearlised Navy Card 11.5cm x 9cm.
- Cut a second piece of Pearlised Navy Card 9.5cm x 7cm. Stick this on top of the larger navy panel using double sided tape or a tape runner (make sure that all the borders are even).
- Stick your invitation panel on top.
- Lastly use mini mounting pads to stick the laser cut flower to the top right corner of your RSVP card.

EVENING INVITATION (Cheque Card Style)
You Will Need:
1 x Small Lily Laser Cut panel (click here)
1/2 sheet Matt off white paper (click here)
1 sheet of pearlised navy A4 card (click here)
1/10 sheet of matt off white A4 card (click here)
appx. 30cm of 19mm Navy Satin Ribbon (click here)
You Will Also Need:
Paper Trimmer
Scorer
Tape Runner or double sided tape (click here)

Instructions:
- Firstly print your wording on to Matt off white paper and cut to size. The finished size should be 18cm wide x 13cm. Make sure you leave appx. 3cm of blank space to the left. You should be able to fit 2 panels on to each sheet.
- Secondly score your invitation panel 2cm in from the left hand side. Fold along the score line.
- Then cut 2 pieces of Pearlised navy card 18cm x 13cm.
- Score one of the pieces of navy card 2cm in from the left. Fold along the score line.
- Place your flat piece of pearlised navy card on to a flat surface. Use double sided tape to stick the left side of the invitation on to the left side of the navy card. Make sure that you keep the tape within the 2cm you have just scored.
- Stick your scored piece of navy card on top using double sided tape. Again, make sure that you keep the tape within the 2cm you have scored. You should now have a 3 layer card where the top 2 layers easily fold outwards.
- Take your small Lily Laser Cut Panel and use your double sided tape or tape runner to stick it in to place along the score line of the navy card. Place it about 1m to the right so that it does not stop the card from opening.
- Run double sided tape down the front left of your invitation. Press the ribbon in to place on top of the tape, making sure that you line up the edge of the ribbon to the edge of the card. Turn the card over, run a line of tape down the outside edge and press the loose edges on top. Trim off any excess ribbon.
- Print “Evening Invitation” on to a sheet of A4 Matt off white card and cut down to size. The finished size should be appx. 2cm x 7cm.
- Cut a piece of Matt Off White Card appx. 1cm larger (3cm x 8cm). Stick this in to place at the bottom right of the card.
- Cut a piece of pearlised navy card 0.5cm larger than your printed panel (2.5cm x 7.5cm). Stick this in to place on top of the matt off white panel.
- Lastly stick your printed panel on top of the pearlised navy card.

ORDER OF SERVICE
You Will Need:
1 x Large Lily Laser Cut Panel (click here)
1/8 x Matt off white card (click here)
1 sheet of pearlised navy A4 card (click here)
at least 1 sheet of matt off white A4 paper for printed inside (click here)
appx. 60cm of 16mm Navy Satin Ribbon (click here)
You Will Also Need:
Paper Trimmer
Scorer
Tape Runner or double sided tape (click here)
Long arm stapler
Instructions:
- First of all cut your pearlised ivory card to 21cm x 29cm. Score and fold in half. This will form your order of service cover.
- Secondly print your order of service wording on to A4 paper and cut to size. The finished size should be 20cm x 28cm. Fold in half and use a long arm stapler to secure the wording to the inside of the cover. Do this carefully to make sure that the staples sit along the crease.
- Run a line of double sided tape across the centre of your card from the folded edge to appx. 2cm in from the outside edge. Starting at the centre of your piece of ribbon, press it in to place on top of the double sided tape.
- Repeat this process at the back of the card.
- Tie a neat bow with the loose ends of the ribbon. Make sure it is nice and tight and then cut off any excess, making a “v” shape at the end of the bow tails.
- Use double sided tape or a tape runner to stick the large Lily Laser Cut Panel on to the card. You will need to line up the edge of the panel with the folded edge of the card. Make sure that the top and bottom borders are even.
- Print “Order of Service” on to a sheet of Matt Off White Card and cut down to size. The finished size should be appx. 5cm x 5cm.
- Cut a piece of Matt Off White Card appx. 1cm larger (6cm x 6cm). Stick this in to place at the bottom right of the card.
- Cut a piece of pearlised navy card 0.5cm larger than your printed panel (5.5cm x 5.5cm). Stick this in to place on top of the matt off white panel.
- Lastly stick your printed panel on top of the pearlised navy card.

PLACE CARD
You Will Need:
1 x Large Lily Laser Cut Flower (click here)
1/20 sheet of pearlised navy A4 card (click here)
1/4 sheet Matt off white card (click here)
1/20 sheet of matt off white A4 paper (click here)
You Will Also Need:
Paper Trimmer
Scorer
Tape Runner or double sided tape (click here)
Mini mounting pads or foam pads
Instructions:
- First of all use your paper trimmer to cut a piece of matt off white card 9cm x 14cm. Score and fold in half.
- Secondly print your names on to a sheet of Matt Off White Paper and cut down to size. The finished size should be appx. 2cm x 6.5cm.
- Cut a piece of Pearlised Navy Card 0.5cm larger than your name panels. (2.5cm x 7cm). Use double sided tape or a tape runner to stick this in to place at the bottom of your place card, making sure that the borders are even.
- Stick your name panel on top of the navy card.
- Lastly use mini mounting pads to stick the Lily Laser Cut Flower in to place at the top right of the place card

THANK YOU CARD
You Will Need:
1 x Small Lily Laser Cut Panel (click here)
1/20 sheet of pearlised navy A4 card (click here)
1/20 sheet of matt off white A4 paper (click here)
appx. 25cm of 16mm Navy Satin Ribbon (click here)
1 sheet Matt off white card (click here)
You Will Also Need:
Paper Trimmer
Scorer
Tape Runner or double sided tape (click here)
Instructions:
- Firstly put a piece of Matt Off White Card 13cm x 26cm. Score and fold in half.
- Secondly use double sided tape or a tape runner to stick your small lily laser cut panel in to place on the left side of your card (appx. 1cm in from the edge)
- Then run a line of tape down the side of your card (just next to the fold) Press your ribbon in to place on top of the tape, making sure that you match the edge of the ribbon with the edge of the card.
- Open up your card and place a line of tape down the inside left of your card. Press the loose ends of your ribbon in to place and cut off any excess. You should now have what looks like a continuous line of ribbon running around one side of your card.
- Print “Thank You” on to a sheet of matt off white paper and cut to size. The finished size should be appx. 2cm x 5cm.
- Cut a piece of Pearlised Navy Card 0.5cm larger than your thank you panels. (2.5cm x 5.5cm). Use double sided tape or a tape runner to stick this in to place at the centre right of your card.
- Lastly stick your Thank You panel on top of the navy card.