Follow our easy step by step instructions
Some time ago, we posted a design guides for Cheap but Chic invitations. It was a really popular post so, we thought we would expand the range to give you ideas on how you can make the rest of your wedding stationery to match. By now, you should know that you can easily change the decorative papers, bow and embellishments to match your theme. Just to remind you, the invitations from this range can be made for less than 65p each!!

Here’s how we made this range:
INVITATIONS
You Will Need:
1 sheet of Matt White Card (click here)
1/6 sheet of Amelia Paper in Powder Blue (click here)
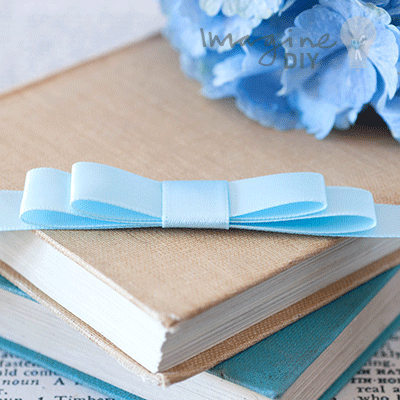
1 Pale Blue Dior Bow (click here)
1 self adhesive pearl blue/aqua (click here)
10.5cm of Narrow edging lace (click here)
Other Things You Might Need:
Paper Trimmer
Tape Runner or Double Sided Tape (click here)
Hot melt glue gun (click here)
A ruler
A Pencil
A Sharp Scissors
INSTRUCTIONS
- Print your invitation wording on to the A4 sheet of card and cut down to size using a paper trimmer. You should be able to print 3 copies on each sheet. The finished size of your invitation panel should be 20cm wide x 9.5cm high. REMEMBER - Keep your wording set off to the right hand side, leaving a gap of about 9cm on the left.
- Use your paper trimmer to cut a piece of card 10.5cm x 21cm.
- Cut a second piece of card 10cm x 20.5cm.
- Use your tape runner to stick the smaller piece of card on to the larger piece of card, making sure you keep the borders even. Once you have done this, stick your invitation panel on top.
- Take your ruler and measure 6.8cm from the top left hand side of the invitation and make a light mark with your pencil. Repeat this process on the bottom left of your card and then join the dots using a light line from your pencil (using your ruler as a guide). You should now have a very light line running from the top to the bottom of your card on the left hand side.
- Take your tape runner and run a line of double sided tape along the pencil mark, making sure you keep the tape to the left of the line. Cut a piece of Ivory lace about 11cm long. Press it firmly on to the double sided tape with the patterned edge facing towards the printed wording. Use your scissors to carefully trim the loose ends.
- Cut a piece of Amelia Powder Blue paper 7cm wide x 10.5cm high. Use your double sided tape runner to stick this on to the left side of your invitation, making sure that the edges match up well.
- Run a line of tape down the middle of your patterned paper and press the dior bow in to place (make sure that it is straight). Pass the loose ends of the dior bow around the back of the card. Carefully cut the loose ends of the dior bow so that you have about 6cm spare on each side. Run a line of tape down the back of the card, following the line of the ribbon. Starting at the bottom, press the ribbon on to the double sided tape. Once you have done this, press the top end of the ribbon on to the double sided tape. You can then use a hot melt glue gun or a little bit more double sided tape to secure the unstuck end.
- Peel off your self adhesive pearl and press it in to place in the centre of your dior bow (at the front of the invitation)And you’re done! You have a beautiful invitation that you’ve made completely yourself!! Well done ;)TIP…..you can drastically change the look of the invitation just by choosing different papers, prints or textures.

SAVE THE DATE CARD or Thank You Card……Less than 40p each!!!
Here’s What You Need:
1/2 sheet of Matt White Card (click here)
1/3 sheet of matt white paper
1/8 sheet of Amelia Paper in Powder Blue (click here)
1 Pale Blue Dior Bow (click here)
3 x self adhesive pearl blue/aqua (click here)
10cm of Narrow edging lace (click here)
Other Things You Might Need:
Paper Trimmer
Scorer
Tape Runner or Double Sided Tape (click here)
INSTRUCTIONS
- Use your paper trimmer to cut a piece of Matt off White Card 10cm 20cm. Score and fold in half (the score line needs to be at 10cm)
- Print your Save the Date wording on to the A4 sheet of matt off white paper and cut down to size using a paper trimmer. You should be able to print 6 copies on each sheet with a bit of fiddling. The finished size of your invitation panel should be 9cm x 9cm.
- Cut a piece of Matt off-white card 9.5cm x 9.5cm. Open up your card and use your tape runner to stick this panel on to the inside right (so you can see it when you open up the card). Use your tape runner to stick the invitation panel on top.
- Print your “Please save the Date” wording on to a sheet of Matt off white paper and cut it down to size. The finished size of your panel should be 3.5cm high x 10cm wide with the wording set to the bottom centre
- Close your card and use your tape runner to stick the Save the Date panel to the bottom front of your card.
- Run a line of tape across the top of the panel (half on the printed panel you just stuck on and half on the card). Cut a piece of May Arts ribbon 10.5cm and stick firmly in to place on top of the tape. Use a scissors to cut off any loose ends.
- Cut a piece of Amelia Blue paper 6cm high x 10cm wide. Use a tape runner to stick this on the front of your card at the top. You should be able to see the lace showing underneath.
- Peel off a self adhesive pearl and stick in to place at the top centre of the printed panel on the front of your card. Stick another pearl on the left and a further one on the right.And you’re finished! As simple as that!!
PLACECARD……Less than 20p each!!!
Here’s What You Need:
1/4 sheet of Matt White Card (click here)
1/8 sheet of Amelia Paper in Powder Blue (click here)
1 self adhesive pearl blue/aqua (click here)
10cm of Narrow edging lace (click here)
Other Things You Might Need:
Paper Trimmer
Scorer
Tape Runner or Double Sided Tape (click here)
A ruler
A Pencil
A sharp Scissors
INSTRUCTIONS
- Use your paper trimmer to cut a piece of Matt off White Card 9cm 14cm. Score and fold in half (the score line needs to be at 7cm)
- Take your ruler and measure 3.8cm from the top left hand side of the place card and make a light mark with your pencil. Repeat this process on the top left of your card and then join the dots using a light line from your pencil (using your ruler as a guide). You should now have a very light line running across the middle of your card.
- Take your tape runner and run a line of double sided tape along the pencil mark, making sure you keep the tape above the line. Cut a piece of Ivory lace about 10cm long. Press it firmly on to the double sided tape with the patterned edge facing down (towards the bottom of the place card). Use your scissors to carefully trim the loose ends.
- Cut a piece of Alessandra Blue paper 4cm high x 9cm wide. Use your double sided tape runner to stick this on to the top of your place card, making sure that the edges match up well.
- Peel off a self adhesive pearl and stick in to place at the bottom of the Amelia Blue paper (see image)And you’re finished! As simple as that!!

ORDER OF SERVICE……from less than £1.00
You Will Need:
1 1/4 sheet of Matt White Card (click here)
Matt white paper (as many sheets as you need for the inside wording)
1/2 sheet of Amelia Paper in Powder Blue (click here)
70cm of Pale Blue Satin Ribbon (click here)
1 self adhesive pearl blue/aqua (click here)
22cm of Narrow edging lace (click here)
Other Things You Might Need:
Paper Trimmer
Scorer
Tape Runner or Double Sided Tape (click here)
Hot melt glue gun (click here)
A ruler
A Pencil
A Sharp Scissors
INSTRUCTIONS
- Use your paper trimmer to cut your A4 card to 21cm x 29cm. Score and fold in half (the score line should be 14.5cm). You should now have a booklet cover.
- Print your front panel wording on an A4 sheet of card and cut down to size using a paper trimmer. You should be able to print at least 4 copies on each sheet (if you set the printer to print in a Landscape Format. The finished size of your panel should be 21cm high x 6.5cm wide. REMEMBER - Keep your wording set to the middle of your panel.
- Take your tape runner and run a line of double sided tape along the edge of the printed panel, slightly overlapping on to the card backing. Cut a piece of Ivory lace about 22cm long. Press it firmly on to the double sided tape with the patterned edge facing towards the printed wording and at least 2mm resting on the card backing. Use your scissors to carefully trim the loose ends.
- Cut a piece of Amelia Powder Blue paper 8cm wide x 21cm high. Use your double sided tape runner to stick this on to the left side of your cover, making sure that the edges match up well.
- Make a Dior bow from your Pale Blue Ribbon (you can follow the instructions shown here if you don’t know what to do:
- Cut a piece of Pale Blue Ribbon 43cm long. Run a line of tape down the middle of your patterned paper and press the ribbon in to place starting from the middle of the ribbon and working out towards the end. (make sure that it is straight). Pass the loose ends of the ribbon around the back of the card. Run a line of tape down the back of the card, following the line of the ribbon. Starting at the bottom, press the ribbon on to the double sided tape. Once you have done this, press the top end of the ribbon on to the double sided tape. You can then use a hot melt glue gun or a little bit more double sided tape to secure the unstuck end.
- Stick your Dior Bow to the centre of the ribbon at the front of your card.
- Peel off a self adhesive pearl and stick in to place in the middle of your Dior Bow.
- For your Order of Service Inserts, you will need to print this onto A4 paper and secure inside your cover. A long arm stapler would be perfect for this. Alternatively, you can punch small holes along the fold and thread narrow ribbon through to hand tie.And you’re done……YAY Well Done You!