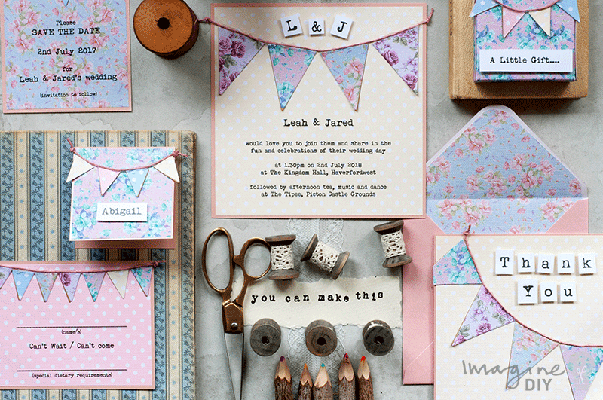
How to Make...Summer Bunting Wedding Stationery
I know it’s the middle of winter as we post this design guide. But many of you will be busy planning spring and summer weddings (and hoping for awesome weather).
When I think about summer weddings, nothing captures the mood quite like bunting. It conjures up the idea of garden parties, pimms and lemonade and croquet and cocktails on the lawn!
So to get you in the mood for your Spring or Summer wedding, we wanted to show off this cute design for you to copy at home. The great thing about this design is that because it’s all mix and match, you can use different papers and different colours to suit the mood of your day.
This range is a little bit fiddly to make but on the plus size, it’s a very low cost range to reproduce.
Whilst I used a sizzix machine to make the bunting, if you make a cardboard template, you can easily hand cut the bunting triangles yourself.
Follow our Top Tip to make your own Bunting HERE
So Here Are The Instructions……

FLAT INVITATION
You Will Need:
1/2 sheet of pearlised blush pink card (click here)
1/2 sheet of buttermilk polka paper (click here)
offcuts of Beatrice linen (click here)
offcuts of Blossom Blue Paper (click here)
offcuts of Blossom Pink Paper (click here)
offcuts of white A4 card (click here)
You Will Also Need:
Pink hemp string
Paper Trimmer
Tape Runner or double sided tape (click here)
Glue Gun (click here)
Mini Mounting pads or foam padsScissors
INSTRUCTIONS
- Use your paper trimmer to cut a piece of Precious Pink Card 14.5 x 14.5cm
- Print your wording on to the Buttermilk Polka Linen Paper and cut down to size. The finished size should be 14cm x 14cm with your wording set to the bottom half of the page. You should be able to fit 2 wording panels on to each sheet.
- Use double sided tape to stick the wording panel on to the Precious Pink Card.
- Using the font “My Underwood”, print your initials and “&” on to a sheet of white card. Leave a gap between them so that you can cut them out. Once printed, cut around them in a square shape. It doesn’t matter if the squares are not even as this adds to the charm. Use mini mounting pads to stick the letters in to place at the top centre of the card. The mini mounting pads will give the letters a raised finish.
- Cut out 4 or more pieces of bunting (depending on the size you have chosen). Arrange them so that they curve across the front of the card. Once you are happy with how they are placed, you can then use your double sided tape to stick them in to place.
- As a nice finishing touch, I have added some pink hemp cord. This is quite a fiddle so if you don’t fancy doing that, you can achieve a similar effect by using a fine liner to draw across the top of the bunting.
- To use the hemp cord, tie a knot in one end. Use your glue gun to stick the knot in to place at the edge of the card. Carefully use the glue gun to stick along the edge of the cord and press in to place at the top of the bunting. Once you reach the opposite side of the card, tie another knot as close as you can to the edge of the card and cut off any loose ends. Use the glue gun to secure it.

SAVE THE DATE
You Will Need:
1/4 sheet of pearlised blush pink card (click here)
1/4 sheet of Blossom Blue Paper (click here)
offcuts of Beatrice linen (click here)
offcuts of Blossom Pink Paper (click here)
offcuts of Polka Pink Paper (click here)
offcuts of buttermilk polka paper (click here)
You Will Also Need:
Pink hemp string
Paper Trimmer
Tape Runner or double sided tape (click here)
Glue Gun (click here)
We've used the font "MY UNDERWOOD"
INSTRUCTIONS
- Use your paper trimmer to cut a piece of Precious Pink Card 9cm x 11.5cm
- Print your wording on to the Blossom Blue Paper and cut down to size. The finished size should be 8.5cm x 11cm with your wording set to the bottom half of the page. You should be able to fit 4 wording panels on to each sheet if you lay it out in a landscape format.
- Use double sided tape to stick the wording panel on to the Precious Pink Card.
- Using the font “My Underwood”, print your initials and “&” on to a sheet of white card. Leave a gap between them so that you can cut them out. Once printed, cut around them in a square shape. It doesn’t matter if the squares are not even as this adds to the charm. Use mini mounting pads to stick the letters in to place at the top centre of the card. The mini mounting pads will give the letters a raised finish.
- Cut out 4 or more tiny pieces of bunting (depending on the size you have chosen). Arrange them so that they curve across the front of the card. Once you are happy with how they are placed, you can then use your double sided tape to stick them in to place.
- As a nice finishing touch, I have added some pink hemp cord. This is quite a fiddle so if you don’t fancy doing that, you can achieve a similar effect by using a fine liner to draw across the top of the bunting.
- To use the hemp cord, tie a knot in one end. Use your glue gun to stick the knot in to place at the edge of the card. Carefully use the glue gun to stick along the edge of the cord and press in to place at the top of the bunting. Once you reach the opposite side of the card, tie another knot as close as you can to the edge of the card and cut off any loose ends. Use the glue gun to secure it.

PLACE CARD
You Will Need:1/10 sheet of pearlised blush pink card (click here)
1/20 sheet of Blossom Pink Paper (click here)
offcuts of buttermilk polka paper (click here)
offcuts of Polka Pink Paper (click here)
You Will Also Need:
Pink hemp string
Paper Trimmer
Scorer
Tape Runner or double sided tape (click here)
Glue Gun (click here)
Mini Mounting pads or small foam pads
We've used the font "MY UNDERWOOD"
INSTRUCTIONS
- Use your paper trimmer to cut a piece of Precious Pink Card 10cm x 5cm Score and fold in half.
- Cut a piece of Blossom Pink Paper 4.5cm x 4.5cm and stick to the front of your place card using double sided tape.
- Use the font “My Underwood” to print your guest names on to white card. Leave some space at each side, above and below so that you can cut them out with a scissors. Once printed, cut around the names. Try and make them as even as possible but a little unevenness will add to the charm.
- Use the mini mounting pads to stick the name panel in to place at the bottom of the place card.
- Cut out 4 or more tiny pieces of bunting (depending on the size you have chosen). Arrange them so that they curve across the front of the card. Once you are happy with how they are placed, you can then use your double sided tape to stick them in to place.
- As a nice finishing touch, I have added some pink hemp cord. This is quite a fiddle so if you don’t fancy doing that, you can achieve a similar effect by using a fine liner to draw across the top of the bunting.
- To use the hemp cord, tie a knot in one end. Use your glue gun to stick the knot in to place at the edge of the card. Carefully use the glue gun to stick along the edge of the cord and press in to place at the top of the bunting. Once you reach the opposite side of the card, tie another knot as close as you can to the edge of the card and cut off any loose ends. Use the glue gun to secure it.

RSVP CARD
You Will Need:1/4 sheet of pearlised blush pink card (click here)
1/4 sheet of Polka Pink Paper (click here)
offcuts of Beatrice linen (click here)
offcuts of Blossom Blue Paper (click here)
offcuts of Blossom Pink Paper (click here)
offcuts of buttermilk polka paper (click here)
You Will Also Need:
Pink hemp string
Paper Trimmer
Tape Runner or double sided tape (click here)
Glue Gun (click here)
We've used the font "MY UNDERWOOD"
INSTRUCTIONS
- Use your paper trimmer to cut a piece of Precious Pink Card 9cm x 11.5cm
- Print your wording on to the Polka Pink Paper and cut down to size. The finished size should be 8.5cm x 11cm with your wording set to the bottom half of the page. You should be able to fit 4 wording panels on to each sheet if you lay it out in a landscape format.
- Use double sided tape to stick the wording panel on to the Precious Pink Card.
- Cut out 6 or more tiny pieces of bunting (depending on the size you have chosen). Arrange them so that they curve across the front of the card. Once you are happy with how they are placed, you can then use your double sided tape to stick them in to place.
- As a nice finishing touch, I have added some pink hemp cord. This is quite a fiddle so if you don’t fancy doing that, you can achieve a similar effect by using a fine liner to draw across the top of the bunting.
- To use the hemp cord, tie a knot in one end. Use your glue gun to stick the knot in to place at the edge of the card. Carefully use the glue gun to stick along the edge of the cord and press in to place at the top of the bunting. Once you reach the opposite side of the card, tie another knot as close as you can to the edge of the card and cut off any loose ends. Use the glue gun to secure it.

THANK YOU CARD:
You Will Need:1 sheet of pearlised blush pink card (click here)
1/2 sheet buttermilk polka paper (click here)
offcuts of Blossom Pink Paper (click here)
offcuts of Beatrice linen (click here)
offcuts of Blossom Blue Paper (click here)
offcuts of white A4 card (click here)
You Will Also Need:
Pink hemp string
Paper Trimmer
Scorer
Tape Runner or double sided tape (click here)
Glue Gun (click here)
Mini mounting pads or foam pads
We've used the font "MY UNDERWOOD"
INSTRUCTIONS
- Use your paper trimmer to cut a piece of Precious Pink Card 14.5cm x 29cm Score and fold in half.
- Cut a piece of Buttermilk Polka Paper 14cm x 14cm and stick to the front of your thank you card using double sided tape.
- Use the font “My Underwood” to print all the letters of T h a n k Y o u on to a sheet of white card. You will need to leave space between each letter so that you can cut them out with a scissors. Once printed, cut around the letters. Try and make them as even as possible but a little unevenness will add to the charm.
- Use the mini mounting pads to stick the letters in to place at the top right of the card.
- Cut out 4 or more pieces of bunting (depending on the size you have chosen). Arrange them so that they curve across the front of the card. Once you are happy with how they are placed, you can then use your double sided tape to stick them in to place.
- As a nice finishing touch, I have added some pink hemp cord. This is quite a fiddle so if you don’t fancy doing that, you can achieve a similar effect by using a fine liner to draw across the top of the bunting.
- To use the hemp cord, tie a knot in one end. Use your glue gun to stick the knot in to place at the edge of the card. Carefully use the glue gun to stick along the edge of the cord and press in to place at the top of the bunting. Once you reach the opposite side of the card, tie another knot as close as you can to the edge of the card and cut off any loose ends. Use the glue gun to secure it.

GIFT BOX
This little gift box is a neat finishing touch. However, to make this particular one, you will need a sizzix machine and the Bigz XL Box Die. To achieve the same effect, you could wrap a different box in the paper and decorate it in a similar way.You Will Need:
1 sheet of pearlised blush pink card (click here)
1 sheet of Blossom Pink Paper (click here)
offcuts of buttermilk polka paper (click here)
offcuts of Polka Pink Paper (click here)
offcuts of white A4 card (click here)
You Will Also Need:
Pink hemp string
Tape Runner or double sided tape (click here)
Glue Gun (click here)
Mini mounting pads or foam pads
Sizzix machine and Sizzix XL Box Die
We've used the font "MY UNDERWOOD"
INSTRUCTIONS
- Use your Sizzix XL Box Die to make a box shape from the Precious Pink Card and the Blossom Pink Paper.
Use double sided tape to stick the pre-cut Blossom Pink paper on to the pre-cut Precious Pink Card, making sure to line up the edges. - Fold along all the creases and use your glue gun to stick the box together.
- Use the font “My Underwood” to print “A Little Gift…….” (or your own personal message) on to a sheet of white card. Once printed, cut around it.
- Use the mini mounting pads to stick the card in to place at the bottom front of the box.
- Cut out 4 or more pieces of tiny bunting (depending on the size you have chosen). Arrange them so that they curve across the front of the box. Once you are happy with how they are placed, you can then use your double sided tape to stick them in to place.
- As a nice finishing touch, I have added some pink hemp cord. This is quite a fiddle so if you don’t fancy doing that, you can achieve a similar effect by using a fine liner to draw across the top of the bunting.
- To use the hemp cord, tie a knot in one end. Use your glue gun to stick the knot in to place at the edge of the card. Carefully use the glue gun to stick along the edge of the cord and press in to place at the top of the bunting. Once you reach the opposite side of the card, tie another knot as close as you can to the edge of the card and cut off any loose ends. Use the glue gun to secure it.